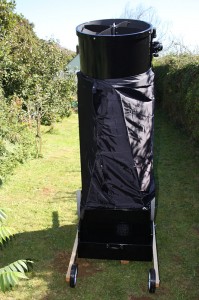
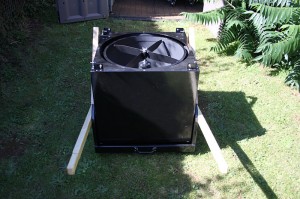
I have been interested in astronomy since childhood but I have only been an active observer since the age of 22, in 1992. Since then, I have got through a variety of telescopes, from small binoculars to a 6 inch Dobsonian (which was my first ‘proper’ astronomical telescope) up to a 12 inch Dobsonian, which was my most recent scope. However, my interests lie in the deep sky, especially visual observing of the deep sky, and I wanted something larger than 12 inches for observing galaxy clusters and faint nebulae. My main deep sky observing interests are galaxies, including Abell galaxy clusters, galaxy trios and Hickson galaxy groups, Abell planetary nebulae and Palomar globulars, plus steadily going through the NGC.
As large telescopes are expensive, even the comparatively cheap Dobsonians, I had resigned myself to never being able to get a larger scope and just scrounging looks through other people’s at star parties. That was until early 2011 when a tax rebate came my way and my aunt suggested I put it towards a large telescope.
I looked at the possibility of getting one of the premium Dobs from the States, as I’d long wanted a premium dob and I fancied an 18 inch Obsession, but when I saw just how much transAtlantic shipping would cost, plus high import taxes just to get it into the UK, I discounted that idea. I decided, instead, to go for one of David Lukehurst’s (www.dobsonians.co.uk) Dobs, an 18 inch, because these are based on the Obsession design and the quality is there. I had thought about a 20 inch but as these were nearly £1000 more expensive – out of my financial reach – I decided that an 18 inch would suit me nicely. I phoned David and we talked about what options I had with the scope.
I decided to go for an 18 inch f/4.5 scope with the mirror made by Nichol Optical. There was a choice of 1/10 wave optics or the bog-standard, but still good, ¼ wave optics and I opted for the ¼ wave mirror, simply because of my tight budget. Most people go for the higher accuracy but when you’re on a shoestring (as I continually seem to be!) the ‘lesser’ one is a good option. Besides, on average – i.e. ‘most’ – nights, you’re not going to see the difference although an experienced observer probably would on transparent nights with excellent seeing, when a more accurate mirror will pull in more planetary detail or a tiny, faint galaxy on the edge of visibility.
The delivery time for the completed scope was four months from the date of ordering, so I finalised my order with David, paid the 50% deposit and waited. As it turned out, the completion of the scope would be delayed another six weeks, because of a problem with a previous order. This was annoying but it was just one of those things that can’t be helped. David was good about informing me of the delay and, in the end, it didn’t matter that much anyway because the weather had been atrocious!
On 7th September, David contacted me to say the scope was nearly complete, apart from final painting, assembly and checks and I arranged to go up to Nottingham and collect it on 14th September 2011.
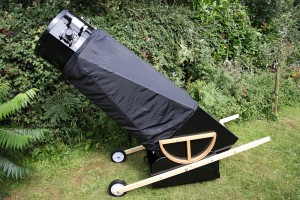
The telescope is solidly built and very heavy, as you would expect with an 18 inch scope. Wheelbarrow handles were offered as an optional extra, but I think they are pretty much essential for such a large instrument. Without them, anybody but the biggest and strongest person would struggle to move a telescope of this size around. I am not small nor a weakling, but I would certainly not have found it easy to move the scope without the handles. I would definitely recommend that anyone buying a scope of this size (or even one of 14 or 16 inches aperture) get a set of these handles to help move it about.
On getting the scope out of the van and into the garden it quickly became apparent that it was very good job that I could not afford a 20 inch or larger one, as the 18 inch only just fit through both garden gates – in fact I had serious doubts at one point if it would be able to go in my shed at the top of the garden, simply because of getting it through the gate to that part of the garden. It is a big bit of kit.
I decided to leave assembling the scope until the next day, despite the fact it was clear, because it was late and when you’re tired it’s no use trying to put together something like this and running the risk of breaking or losing something.
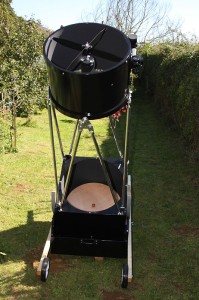
I assembled it the following afternoon after work. It was easy to put together and took about five minutes. The scope is a serrurier truss design, as most large Dobs are these days, and the trusses are numbered, so it is easy to see what goes where. The upper tube assembly is light enough to lift onto the trusses without any assistance from another person. This is helped by the fact that the focuser and finder are a single unit which can be unbolted from the UTA. Once the UTA is on, pop the focuser assembly on, tighten the nuts, collimate, and it’s ready to go.
The trusses themselves are made of aluminium and I could have had them anodised for extra cost, but I didn’t choose this option because, again, it was cost I couldn’t justify. However, I will get some pipe insulation, which is easily obtained from a hardware shop for little cost, and cover the trusses with that to cut down on potential light scatter.
The collimation bolts are good, no nonsense solid ones, quite unlike the flimsy ones you sometimes get on mass-produced telescopes. David has supplied heavy duty springs, too, so the primary mirror should not move easily and go out of alignment. As for the secondary, this too is held by a solid bolt with wing nut and the adjustment screws are large allen bolts. He has designed the scope so it stays as rigid as possible, despite being a truss design. The spider is not flimsy either, and is held to the cage with small bolts.
The bearings are made of wood and Teflon (PTFE) and are very solidly built large bearings, not these tiny little six-inch things you get from some other makers, whether they’re mass-producers of scopes or not. Because of the bearings, the scope moves nicely.
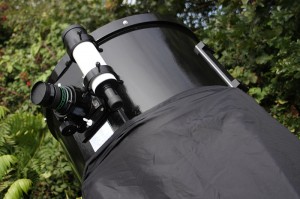
I opted for the basic Crayford rack-and-pinion focuser rather than the nicer but far more expensive Crayford Moonlite focuser, which costs between £180 and £270 depending on which model you go for. The basic focuser does the job and will do nicely as it is of good quality and is robust.
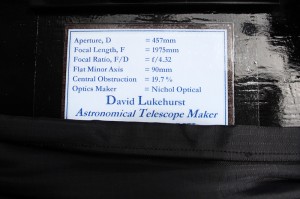
As stated above, the optics I ordered were to be ¼ wave with a focal ratio of f/4.5. When David handed me the piece of paper with the details and specifications of the main mirror I was pleased to see that I had, in fact, got an f/4.3 mirror with 1/8 wave accuracy. So, I got a better mirror for the same money! The mirror had been vacuum coated, so there were marks in the coating (missing coating) in a couple of places on the edges of the primary where it had been held in the chamber. I have seen this before, it has been discussed on Cloudy Nights and other forums, and it has no effect on light-gathering power, so it was not much of a big deal. When I get the chance (i.e. when I summon the courage to touch the big mirror!), I want to move it around in the cell so that the worst of the marks are beneath the clips.
The mirror is made from Suprax low expansion glass.
Another optional extra was a shroud which, to me, is another essential to minimise light scatter when looking for faint objects. David does not make the shrouds, they are made elsewhere. The shroud is made from a light material and is fastened with poppers but, after putting it on and taking it off a couple of times, I don’t think it will last very long, as the material is too thin. Already there is a hole in the material next to the bottom most popper; this isn’t just my clumsiness, it is the very thin material, but this is the only downside. If and when it does rip badly, I will get or make one of another material. I would quite like a shoud made of heavier material so it doesn’t get quite as soaked through when the humidity is high.
The eyepiece is not that high off the ground, about 6’ 5”, so I only need a short stepladder to observe at the zenith. This is because of the relatively fast f/4.3 mirror, which gives a focal length of 78 inches (1975mm) so, at 5’ 7½” I only need stand on the second rung of the stepladder to comfortably observe at the zenith.
The scope eventually got its first look at the sky, ‘first light’ as it tends to be called, on Sunday 18th September. I put the scope together, which at least is getting easier and waited – impatiently it has to be said! – for darkness. Collimation was a breeze as, despite the scope being loaded into a van, driven along 200 miles of motorway network, carried on a ship across the bumpy Solent, driven along the appalling goat tracks that pass for roads on the Isle of Wight, unloaded from the van and bumped across the cratered and uneven back lawn, it was not that far out and even if it had been, the large bolts make it a joy to do and not a boring chore. It took 30 seconds to line up the secondary and then the primary – it was FAR easier than either my 12 inch or my 8″ scopes.
The first object I lined the scope on was the Alcor/Mizar double star system in Ursa Major, as it was not yet dark and I was just itching to look at something. My collimation was spot on as the out-of-focus stars were perfect donuts and the stars focused to points easily. The optics look pretty good, too, judging by what I was seeing. Coma, however, IS present, but that is because the mirror is a fairly fast f/4.3 and it’s nothing that a Paracorr or similar device can’t put right. I can live with a bit of coma for a while.
As it got darker, I turned the scope to deep sky objects, starting with NGC 7006 a globular cluster in Delphinus. This was a far better view of this object than any views I’d previously had. The sky wasn’t great, it kept clouding over and the seeing wasn’t very good, but at 247x the cluster was well resolved and showed a bright, dense core.
My favourite deep sky targets are galaxy groups and clusters, things I could look at reasonably well with the 12 inch but which need a 16″ or larger scope for the best views, so I turned the scope towards the NGC 7331 group in Pegasus. NGC 7331 was very bright and detailed indeed, easily the best view I have ever had of this galaxy. Not only that, the tiny galaxies (the ‘Fleas’) in the same field of view were relatively easy to see. The Fleas were tough in my 12″ but in the 18″, they were not particularly hard to see. All the brighter Fleas were there, plus mag 16.8 NGC 7336 and MCG+6-49-44 – my first MCG galaxy from the back garden!
At this point, it decided to cloud over before I could get to Hickson 92 (Stephan’s Quintet) so I packed the scope away. So far (as of 22/09/11) I have only been able to use the scope once, although I am hoping a forecast ‘Indian Summer’ will bring some more opportunities within the next few weeks and the opportunity to test the optics at much higher powers than 247x, such as 600x and above. I am pleased with the scope as the quality far exceeds anything I had previously owned – and being big glass doesn’t hurt either!
